Build your own Home Server and Made It Publicly Accessible on the Internet - Part 1

Running your own home server is one of the most empowering things you can do as a backend enthusiast, hobbyist, or tech-savvy tinkerer. Whether you're hosting personal web projects, streaming your own media library, managing automated backups, or simply learning more about how servers and networks work, a home server gives you full control over your digital environment.
But building a home server isn’t just a matter of plugging in an old computer, it involves a mix of choosing the right hardware, setting up reliable storage, and solving the challenge of exposing it safely to the internet. In this post, I’ll walk you through how I built my own home server from mostly recycled parts and explain how I made it accessible from anywhere in the world using a combination of a free cloud VPS and a VPN-based proxy setup.
Whether you're aiming to self-host services like Jellyfin, Nextcloud, or host your favorite game server, or just want to get more out of that old laptop gathering dust in your drawer, this post will give you the foundation you need to get started and do it the right way.
Building your Home Server
One of the first decisions to make when setting up a home server is choosing the operating system. Technically, you can use almost any Linux distribution, but I personally prefer Ubuntu due to its widespread support, active community, and excellent compatibility with most server applications. Ubuntu is also well-documented and frequently used in production environments, which means you'll find plenty of resources if you ever run into issues.
Since the goal is to keep our server environment clean and maintainable, we'll run most of our services inside Docker containers. This allows us to isolate each application, manage dependencies independently, and easily move or back up services. For that reason, it's important to choose a Linux distribution with good support for Docker, and Ubuntu fits that requirement perfectly.
Installing Docker on Ubuntu
Once you have Ubuntu installed on your server machine, the next step is to install Docker. Docker lets you run applications in containers, perfect for a home server environment. Here’s a quick and reliable way to install Docker on Ubuntu:
- Update your system packages
Run the following commands to make sure your system is up-to-date
sudo apt update
sudo apt upgrade -y
- Install required dependencies
These packages are necessary to letaptwork with Docker repositories:
sudo apt install -y ca-certificates curl gnupg lsb-release- Set up Docker's
aptrepository
# Add Docker's official GPG key:
sudo apt-get update
sudo apt-get install ca-certificates curl
sudo install -m 0755 -d /etc/apt/keyrings
sudo curl -fsSL https://download.docker.com/linux/ubuntu/gpg -o /etc/apt/keyrings/docker.asc
sudo chmod a+r /etc/apt/keyrings/docker.asc

# Add the repository to Apt sources:
echo \
  "deb [arch=$(dpkg --print-architecture) signed-by=/etc/apt/keyrings/docker.asc] https://download.docker.com/linux/ubuntu \
  $(. /etc/os-release && echo "${UBUNTU_CODENAME:-$VERSION_CODENAME}") stable" | \
  sudo tee /etc/apt/sources.list.d/docker.list > /dev/null
sudo apt-get update- Install the Docker packages
sudo apt-get install docker-ce docker-ce-cli containerd.io docker-buildx-plugin docker-compose-plugin- Verify the installation
You can test if Docker is installed correctly by running:
sudo docker run hello-world- (Optional): Run Docker as a non-root user
To avoid typingsudobefore every Docker command:
sudo usermod -aG docker $USER
# Then log out and log back in, or run:
newgrp docker
Managing Services with Docker and Docker Compose
Once Docker is installed and ready, the real power of a home server begins to shine. Instead of manually installing and configuring software directly on the system, Docker allows you to spin up services in isolated containers that are easy to manage, replicate, and update. This makes your setup cleaner, safer, and much more modular.
For more complex services, or when you want to manage multiple containers together (like a media server and its database), Docker Compose is the perfect tool. It lets you define all your containers in a single YAML file, along with their configuration, networks, volumes, and dependencies.
Here’s an example docker-compose.yml for a self-hosted media server like Jellyfin:
version: '3.9'
services:
  jellyfin:
    image: jellyfin/jellyfin
    container_name: jellyfin
    network_mode: "host"
    volumes:
      - /mnt/raid/apps/jellyfin/config:/config
      - /mnt/raid/media:/media
    restart: unless-stopped
This file describes a service called jellyfin running on the host network (so it can be accessed directly on a port like 8096). The volumes directive maps host directories into the container, ensuring that your configuration and media files are stored on disk and not lost when the container is stopped or removed. You can look how to configure each image in their docker hub page.
To start this service, navigate to the directory containing the docker-compose.yml file and run:
docker compose up -dThe -d flag runs the container in detached mode (in the background). To stop it:
docker compose downWhere to Store Your Docker Volumes
Organizing your data on disk is critical for maintaining a reliable home server. By default, Docker stores volumes in /var/lib/docker, but this isn't ideal for a few reasons:
- It's not easily visible or organized.
- It’s harder to back up or move between systems.
- If you reinstall Docker or your OS, you risk losing data.
Instead, it's best to explicitly map your Docker volumes to specific directories on your mounted storage. This makes it easy to know where each service stores its configuration and persistent data. It also simplifies backup strategies, you can simply back up your directory periodically or use scheduled tools like rsnapshot, borg, or even rclone for cloud sync.
Always avoid writing important data inside the container filesystem itself, instead use Docker volumes or bind mounts pointing to a secure, redundant storage location.
Managing Ports for Services
As your home server begins to host more and more services keeping track of which ports are in use becomes essential for avoiding conflicts and maintaining order. One best practice I follow is to define port ranges for different categories of services. For example, I reserve ports between 8000 and 9000 exclusively for web-based applications running in Docker, such as Jellyfin, Nextcloud, or self-hosted dashboards. For game servers and other less conventional services, I use higher ports, usually above 25000, to clearly separate them from core infrastructure.
To stay organized, I maintain a simple text file where I document which port is assigned to each service. This helps avoid accidental overlaps, speeds up troubleshooting, and simplifies migrations. The file might look something like this:
# Port Map
8000 - Homepage / Reverse Proxy
8001 - Blog
8002 - React System
8096 - Jellyfin
8181 - Transmission
8787 - File Browser
...

25565 - Minecraft Server
25567 - Modded minecraft Server
27015 - CS:GO Server
While it's always possible to list open ports using tools like ss, netstat, or lsof, having a manual mirror of your port assignments is incredibly useful. It allows you to quickly identify unexpected or unauthorized services running, for example, when you check open ports and see something active that isn't in your list, it’s a strong signal to investigate. This simple practice can help you spot misconfigurations, detect forgotten test containers still running, or even uncover potential security issues on your system.
Security and Firewall Considerations
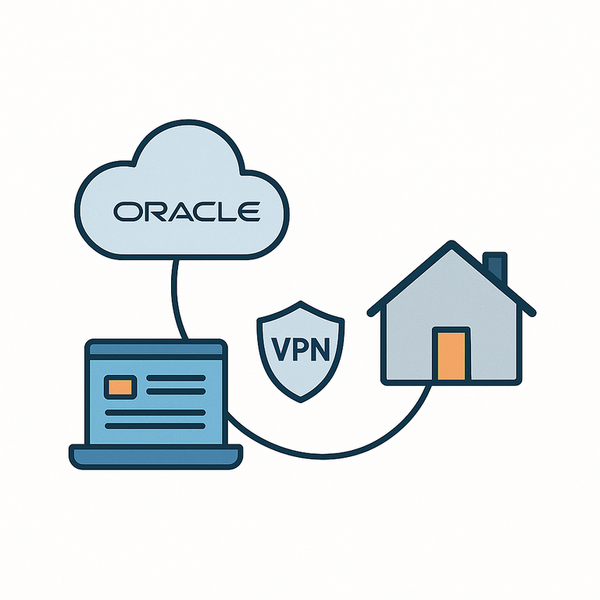
One common concern when running a home server is the risk of exposing vulnerable services directly to the internet. Fortunately, in our setup, the home server itself remains behind a NAT and firewall, not publicly reachable on its own. Instead, we route all public access through a remote proxy which handles incoming requests and securely forwards them to the home server through a private VPN tunnel. This means the attack surface is drastically reduced: only the proxy server is exposed to the internet, and it can be tightly locked down with firewalls, rate limiting, and minimal open ports. While you should still apply basic security hygiene on your home server (like keeping systems updated and avoiding unnecessary services), you don’t need to worry about exposing ports or running a full-fledged firewall on your home network, the external proxy acts as a secure gatekeeper.
What’s Next: Making It Public
This concludes Part 1 of our journey into building a home server. In Part 2, we'll dive into how to make your home server publicly accessible. We'll explore the exact strategy I used to expose my server to the internet while keeping it isolated and secure. Stay tuned!